January - March 2024
- Jul 30, 2025
- 4 min read
Dev Log 18
Project Update - January 2024
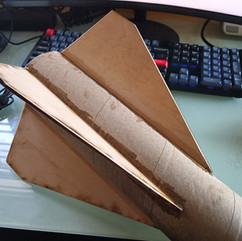
There were still a couple of small things with Air MK1 that needed to be done, so in January I did just that. First up was installing the rail buttons on the vehicle (figs 1, 2). These rail buttons are 3D printed and fit in a 3030 aluminum extrusion.


I also put together another TFAC r3 board, and finally got the GNSS radio working (fig 3)! The issue is what I thought it was - a bad GPS antenna.

Another cool thing I did this month is a make a PCB assembly montage of TFAC. It was my first time doing something like this, and I learned a lot about recording your projects and editing videos. Here's the link to the video - https://youtu.be/mceE_PpdT4M
After all that hardware stuff, it was time to work on TFAC's flight software. I was having some issues with transmitting packets; what I did to fix this is increase the Air Data Rate, and change my data packetizing library (fig 5, 6).


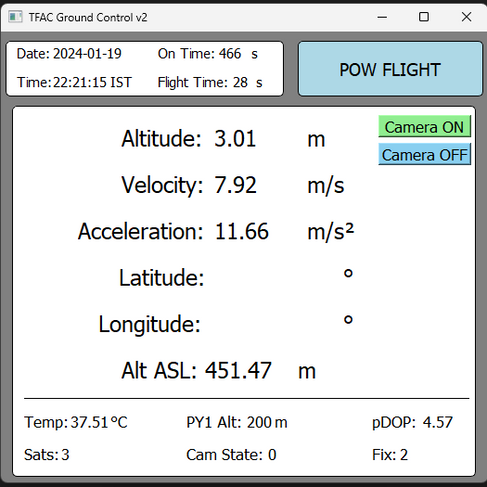
I really wanted two-way comms, so I could remotely control when the cameras turned on and have a Ground-Locked state so I could perform pre-flight tests on the vehicle while it was turned on. I already got two-way comms working in the back end, now I had to write the code for the GCS to reflect that. I included a vehicle command section where I could turn the cameras on or off, command the pyro channels, and change the avionics' states (fig 7).

Project Update - February 2024
Sooooooooo I messed up soldering the new TFAC r3 board (figs 8, 9). I didn't inspect the board well enough after soldering and so I didn't catch the fact that one of the load cells was bridged. When I powered the board with a 3s LiPo and commanded that load cell to turn ON, I heard a loud pop and was greeted with the unpleasent site of a hole in my load cell :/


After that unpleasent event, I was met with another unpleasent event! This time my barometer started acting up (fig 10), or rather down. Whenever a telemetry packet is sent there's a change in the read interval for the baro which causes a change in the measured pressure. To fix this I played around with the ADR and UART rate until it was resolved.

Pleasent event alert - The camera commands work well (fig 11)
Well this is sad. I broke another TFAC board (fig 12). This was extremely stupid. I had the switch wire right up against the 5V and GND lines of the servo, when I plugged in the battery it looks like I fried the Teensy's VREG. I think it should be salvageable, and then only think I need to do is replace the VREG.

With all that done it was time to launch Air MK1. I packed up the rocket (fig 13) and sent it to my mentor who has a motor and will be launching the rocket. I can't go launch the rocket because I have my 10th Grade finals.

Next up Air MK2 (fig 14). This is going to fly higher, faster, and I'm going to implement everything I learned from Air MK1 into this. This will be a dual deploy rocket, meaning it has a drogue parachute deploy at apogee and a main that deploys closer to the ground, controlled by TFAC. The forward section of Air MK2 holds the nosecone, eyebolt bulkhead and main parachute. The aft section holds the 54mm motor mount tube, thru-the-wall fins, eyebolt bulkhead and drogue parachute. Both sections of airframe are attached by a coupler which doubles as the avionics bay with avionics and cameras.

I also designed the avionics bay (figs 15, 16). The av-bay holds TFAC, 3s LiPo, Telemetry radio and antenna, GNSS antenna, and a pull pin switch for arming the stack. The av-bay has three physical parts - the sled, forward and aft bulkhead. The sled is fully 3D printed. The forward and aft bulkheads are 3D printed out of PETG at a high infill and have 5mm plywood plates epoxied on them. The whole bay maintains structural integrity by two 6mm threaded rods that run through the whole bay.


Project Update - March 2024
Lot of Air MK2 progress this month. The vehicle is almost fully done. Cut the tubes, got the fins cut, fin slots cut, motor mount epoxied in, inner fillets, outer fillets, sanding, beveling, painting (figs 17 - 24)


Also finished up the av-bay (figs 25, 26).


